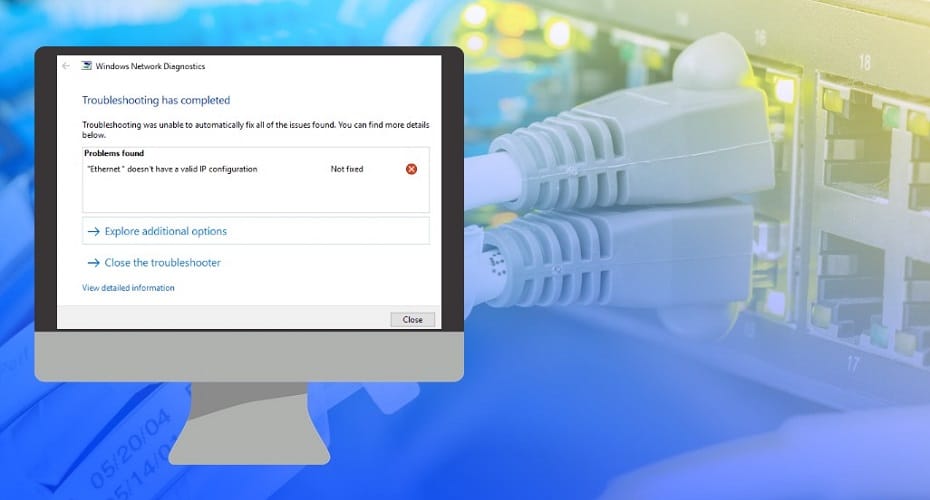
Ever encountered “Ethernet doesn’t have a valid IP configuration” while browsing the web? Well, worry no more because this quick-read provides a detailed coverage of how to fix this and other related errors.
Ethernet is a system that connects multiple computers over a wired connection that allows different computers to share info. Once in a while, users may encounter errors while accessing the web. A common error that you may see on your screen is “Ethernet doesn’t have a valid IP configuration”. In this article, we’ve captured some quick, proven, and effective ways to fix this error once and for all. Here are the methods you may want to try out:

How to Fix this Error
Below are some methods, recommended by experts, that you can use to fix “Ethernet doesn’t have a valid IP Configuration” error alert.
Method 1: Reset Winsock Protocol
You can fix this error by simply resetting your PC’s Winsock Protocol. You can do that with the help of Windows command prompt utility or Powershell. Here are the steps to follow to reset Winsock protocol using CMD.
Step 1: Press Windows + X keys on your keyboard then from the pop-up menu select the “Windows PowerShell (Admin) “

Step 2: Type in and execute this command “netsh winsock reset”

Step 3: Next, execute these two other commands: “netsh int tcp reset” and “netsh int ip reset”.

When all that is done, restart your PC so that the changes can take effect. Check to confirm that the “Ethernet doesn’t have a valid IP configuration” alert is fixed. If not, then consider the next method.
Method 2: Replace the Network Card Driver
If the above method doesn’t fix the error, then consider replacing your PC’s network card driver. To do this, here are the steps.
Step 1: Click the “Start” button or press “Windows” key then type “Network and Internet” then go to “Network Sharing Center” > “Changing Adapter settings”

Step 2: Select “Ethernet” then click “Properties” > “Configuration” > “Driver”.

Step 3: Choose “Update the driver”. You can do this with the help of “My Computer Finder” then check the history of installed drivers under the default directory. Also, you can opt for the option of “Backup Driver” if you have a backup network card driver.

If the error was a result of lack of or outdated network card driver, then the above operation should be able to get if fixed. If not then it’s probably due to some other problem.
Method 3: Uninstall and Reinstall Network Card Driver
If after replacing the network card driver, the error alert still persists, then consider uninstalling and reinstalling the network card driver. Here’s how:
Step 1: Click “Start” or press “Windows” key then type in and search for “Device manager”.
Step 2: In the drop down menu, find “Realtek PCle” under “Network Adapters”
Step 3: Uninstall the driver. Windows should be able to reinstall it automatically. If not then you might have to download and install it manually. Alternatively, you can make use of a third party software to install the network card driver for you.

Method 4: Change Network Adapter Settings
This is another simple way to fix “Ethernet doesn’t have a valid IP configuration” error. Here are the steps:
Step 1: Head over to settings by simply pressing “Windows + I” keys then in the search bar, type in “Network Status”

Step 2: In the next pop up window, select “Disable”
Step 3: Click on “Advanced Network Settings” then choose “Change adapter options”
Step 4: “Disable” the Ethernet adapter connection for about 15 seconds then “Enable” it.

If done successfully, the invalid IP will be removed and your system will have a new IP configuration.
Method 5: Clean Up Network Cache
Another common cause of invalid IP configuration is corrupted network cached files. Luckily, there’s an easier way to clean up all of then using command prompt. Here’s how.

Step 1: Use Windows CMD or PowerShell utility
Step 2: Type in the following commands:
ipconfig/release
ipconfig/flushdns
ipconfig/renew
That should refresh your IP configuration and do away with the old offending IP address. Restart your PC to save and effect the changes then check if the error is resolved.
Method 6: DHCP Client is Enabled for Wireless Configuration:
If the error alert persists on your screen, then it’s likely that your DHCP client is enabled for wireless configuration. Here’s how to fix it.
Step 1: In CMD or Powershell enter “Services.msc” to access Windows services directory.
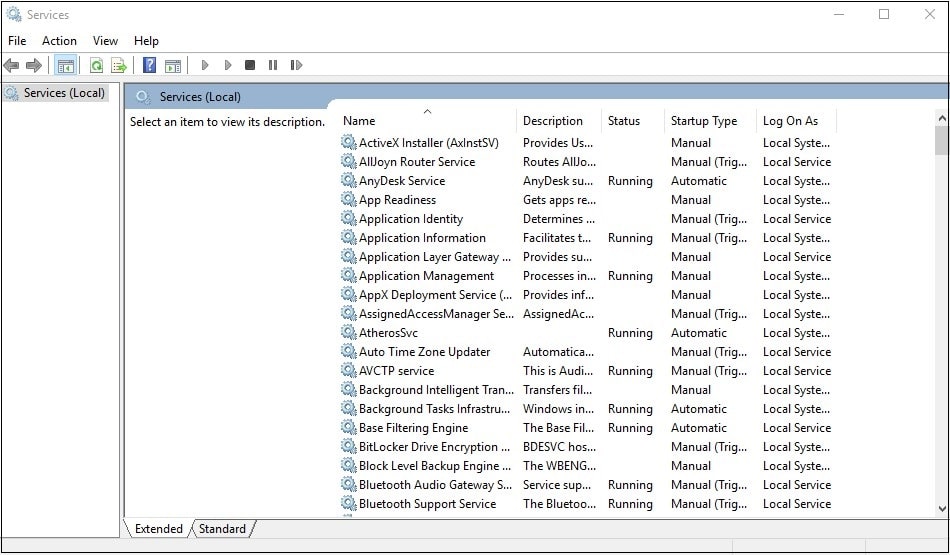
Step 2: Find Wired Autoconfig and WLAN Autoconfig and set the startup type to “Automatic” and Service status to “Start”.


Step 3: Locate DHCP client then ensure the startup type is set to “Automatic” and service status set to “Start”.

Step 4: Under the “general” tab, set the startup type to “automatic” and then click “Apply” then “OK”. Restart your PC to save all the changes.
That should be able to fix the error and remove the alert from your screen. If not, proceed to the next method.
Method 7: Manually Configure the IP Address

If automatic IP resets don’t seem to fic the error, you can try doing it manually. Follow these steps:
Step 1: Open “network and sharing center” then select Ethernet adapter which you are using and after that click on the “Properties” option.
Step 2: choose you internet protocol version: either Internet Protocol version 4 (IPv4) or select Internet Protocol version 6 (IPv6).
Step 3: Next, choose between one of these cases:
Case 1:
In case you have IP address that is static you need to select automatic configuration method.
Case 2:
If you’ve set default setting you need to switch to static setting of IP addresses by simply following these details:
IP address: 192.168.2.5
Subnet mask: 255.255.255.0
Default gateway: 192.168.2.1
Preferred DNS server: 8.8.8.8
Standby DNS server: 8.8.4.4
Two things to remember here:
1. Default Gateway: It is the IP address of your router or modem. It depends on where the Ethernet cable is connected to.
2. IP Address: You can set IP address of your choice but it must follow the format of default gateway address.
Example: if you have default gateway address as 192.168.2.1 then your IP must be 192.168.xx. In this “xx” can be any number between 2 and 255.
If you followed the steps through to the end then congratulations, you’ve successfully configured your IP address manually. Now, check if the error still exists. If it’s fixed, then you can relax and give yourself a pat on the back. If you’re still getting the error alert, then proceed to the next method.
Method 8: Check the Ethernet Cable/ Modem/ Router
Check the Ethernet cable you’re using. It could be the cause of the error. More often than not, broken Ethernet cables result in a lot of connectivity related malfunctions and error alerts. So, you may want to check and confirm that yours is in good shape.

In the case of routers, there’s a power switch. To jump start the device, just in case it’s the case of the error alert”, press that button to switch off the router and then after sometime power it on. If router doesn’t have power switch then you can plug it off the socket and then plug on after about 20 seconds. That should do the trick.
If you’re suspecting that the error alert is because of modem connectivity problem, simply restart the device to refresh its settings.
Somehow the above three methods should be able to fix the problem. To be sure, just check that you PC isn’t showing that error message any more.
1. Why are dynamic IP addresses recommended?
There are two main reasons why dynamic IP addresses are preferred over static IPs. First of all, they’re much cheaper and easier to manage than static IPs. Secondly, they support easy and automatic configuration on the DHCP server.
2. How do I configure dynamic IP addresses for myself?
The procedure varies with the type of device. For Windows 10 users, here are the steps.
- Go to “Control Panel”> “Network and Sharing Center” > “ Change Adapter settings” > “Network Connections”
- Under Ethernet and Wi-Fi connections, right click the one you want to change then choose “Properties”
- Go to “This connection uses the following items” then select “Internet Protocol Version 4 (TCP/ IPv4)”
- Click “Properties”> “Use the following IP address” then update your IP accordingly. Click “OK” to save the changes.