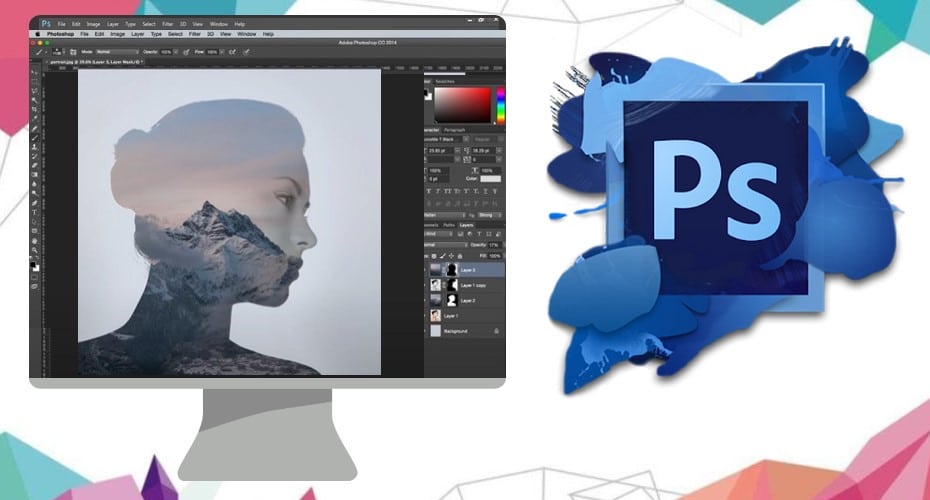
What kind of effect can a portrait and a landscape photograph mix? I'm going to show you how to make a double exposure effect image in photoshop, and maybe, you can be on the cover of a fashion magazine.
In double exposure, a photo of a person is combined with a landscape image to create a single image. Such special effect photos can be used on the front page of magazines, mock-up designs, book covers, and much more.
The double exposure effect helps to make images more appealing to the target audience. To get a perfect double exposure image, you need to use various Photoshop tools to get a clean original that looks natural. While working on the two images, pay close attention to how they overlay each other to ensure they look natural and blend well.
1. Prepare Your Material
To get the double exposure effect, we need to have two photographs. Preferably a portrait and a landscape image. To get the right images, visualize the image result that you want. In addition, the two images should have great contrast.


It is better to choose a clean background portrait photo without any other messy element. This will be convenient for our post-processing in Photoshop.
The scenery photos should be chosen according to your preferences. This depends on the use of the photo and whether the images will match well.
2. Processing of the Person’s Portrait Image
First, open the portrait image in Photoshop. For portrait processing, we need to increase the portrait’s brightness and contrast.

This step can be done by creating adjustment layers in Photoshop. It won’t alter or damage the image at all. This provides flexibility if you want to make further adjustments.
How to Adjust the Photo in the Adjustment Panel in Photoshop:
Step 1: Click on Image > Adjustments.
Step 2: Select levels or curves to adjust the tone and color.
Step 3: To further adjust color, click on hue/saturation or color balance.
Step 4: Adjust the properties till you strike the right color balance.

3. Cut Out Portraits
On the left menu bar, select the magic wand tool. Use it to select the main body of the portrait. If you are not familiar with image matting, I suggest you read this article first.
Use the shortcut CTRL + Shift + R to refine the hair a little bit and make the edges smoother. Then delete the background. The magic wand can also be used to select the background that has relatively the same color.
Alternatively, use the lasso tool to select the part of the image that you want to retain. Then to select the background to remove it, click Select > Inverse. The lasso marquee will form around the background. Click delete to remove the background.

4. Resize
Now you can import the landscape image and put it above the portrait. Possibilities are high that they may not be the same size.

Thereby, resize the landscape so that it is the same size as the portrait. Use the crop tool to remove some unnecessary parts in the image. The two images should fit perfectly together, hence make as many adjustments as possible.

5. Load the Selection
Create a new layer with a white background below the portrait layer. Then hold down the CTRL button and click on the portrait photo to load the selection of the portrait.

Select the portrait selection, then click on the landscape layer, and create a layer mask (click on the layer mask icon in the layers panel). You will get a landscape shot of the outline of the portrait.

6. Overlay
Now place the image portrait on top of the landscape layer and change its layer blending mode to “Overlay”. Do this by clicking on the layer, right-click, then choose blending options on the blending mode change to “overlay”.

This will help the portrait and the landscape to blend perfectly. Try not to modify using many settings that can alter the images, and you may find it hard to track the changes made.

7. Edge Treatment
Click on the mask button of the landscape photo. You will use a soft brush over the mask of the landscape layer for edge treatment.
Choose the diameter of the brush tool, and using a black brush, gently wipe out the edges to make the portrait wheel edge smoother. Do this gently to ensure you don’t miss out on a part and perform the step perfectly.

8. Enhance the Effect
Look at the combined images to see what you can rectify further. You can add a gradient layer or adjust the color of both layers to make it more appealing. Choose contrasting colors to make the image look appealing.
The colors need to combine well with the theme of the image. You can add other effects to make it better. However, ensure you don't alter the image at all. Just enhance the effect to make it look as natural as possible.

That’s how you can create a double exposure effect in Photoshop. You can do this on a variety of images and use them for your projects, designs, magazines, and other visuals.
As long as you choose a great portrait and landscape image, you will never go wrong with the double exposure effect. The end product will always be pleasing.