
Is your Notebook’s screen brightness not adjusting properly even when you try moving the Brightness Slider? Don’t you worry! In this guide you find invaluable insights on how to fix the “Windows 10 brightness not working”problem. Read to find out more…
Computers such as laptops, desktops, and even Notebooks running on windows 10 may have brightness issues once in a while. Usually, this can be easily fixed by making some adjustments in the PC’s power settings or by updating the display drivers. Other common, first-line, solutions to this problem also include restarting your PC or updating your Windows operating system.
In some instances though, none of the aforementioned fixes may be of any help in resolving the screen brightness issue. Besides, some of the above-mentioned solutions may only work in some types or models of computers. Below are some of the methods you can use to resolve the “windows 10 brightness not working” problem on just about any type or model of computer.
Method 1: Update the Display Adapter Drivers
A common cause of brightness issues in windows 10 is outdated display drivers. The best way to fix that is to download and install the latest display and chipset drivers. There are a couple of third-party software that you can use to update display and chipset drivers.
Step 1: Type Device Manager on the search bar then clicks on the Device Manager icon that appears top of the search results window. Alternatively, you can right-click on the start button, then on the WinX menu, select Device Manager. Either method will open the Device Manager window with a list of all the installed drivers.

Step 2: Among the enlisted drivers, locate and double click on Display adapters in order to access the available display adapter drivers on your computer.

Step 3: Once the available Display adapter driver appears, right-click on it. A popup menu will appear with some 5 options to choose from. Select the first option – Update driver.

Step 4: A popup window with the name of the particular display driver that you wish to update will appear with the question “How do you wish to search for drivers?”
On the same window, you’ll also see two options: i). Search Automatically for updated driver software ii). Search my computer for driver software.
Step 5: Choose the first option (Search automatically for updated driver software). Wait for the automatic driver update to run to completion then restart your PC.

Method 2: Fix Any Issue with PnP Monitor Driver
Plug and Play (PnP) monitor driver is a generic display driver. Meaning, it is automatically installed on your PC when you install the Windows OS. Unlike most device drivers, you won’t have to install this one. However, if enabled or disabled, it can impair the usual smooth control of brightness in Windows 10. Follow these steps to enable PnP monitor driver on your PC:
Step 1: Type Device Manager in the search bar then click on the Device Manager icon that appears top of the search results window. You can also access the Device Manager by simply right-clicking on the start button then selecting Device Manager from the WinX menu. Whichever way you choose, the Device Manager window will appear with a list of all the drivers installed on your computer.
Step 2: From the list, locate and double click on Monitor in order to reveal the Generic PnP monitor driver.

Step 3: Right-click on Generic PnP Monitor to check whether or not it is “Enabled”. From the popup menu options, select Enable device (if it’s disabled) or click on Disable device (if it’s enabled).

Step 4: On the Device Manager window, click on the Action tab then from the popup menu options choose scan for hardware changes. Wait patiently for the hardware scan to run to completion then restart your PC.
Method 3: Modify Registry Device Values
Another way to fix the “Windows 10 brightness not working” problem would be to modify the registry values. Here’s how to do that:
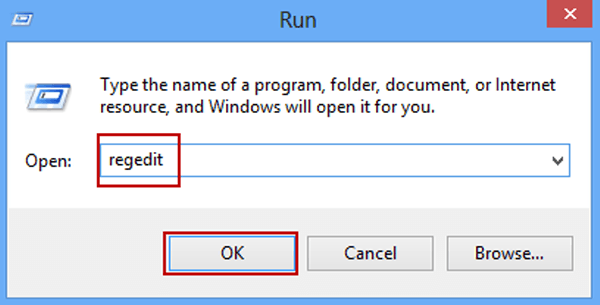
Step 1: Press Windows + R together to access the Run window. On the Run window, type regedit then hit Enter to open the Registry Editor. Alternatively, you can open the Registry Editor by simply typing regedit on the search bar then clicking on the Registry Editor icon in the search results window.
Step 2: Once you open the registry, navigate to the following location:
Step 3: Next up, double click and then set the FeatureTestControl DWORD’s value data to “0000ffff”. That's all you need to do in the registry for now. Exit the registry then check again to see if the brightness adjustment settings are working. If it’s possible to adjust the brightness after the registry edit, then that’s great.
Congratulations are in order. However, if modifying registry device values did not fix it then consider the next method in this list. Maybe you’ll get lucky with the next one.

Tip:
- Modifying registry values incorrectly can cause serious system-wide problems that may require a complete reinstallation of Windows.
- Always remember to back up the registry before making any change therein. Such backup copies will come in handy whenever something untoward happens while editing the registry.
Method 4: Modify the PC’s Power Plan
If your PC has issues with its brightness control settings, maybe it’s because the current power plan is set to disable brightness adjustment. If that’s the case, the fix would be to simply turn off the “Enable Adaptive Brightness” option in the power settings. Follow these steps to modify your computer’s power plan:
Step 1: Type Edit Power Plan in the search bar then hit Enter.

Step 2: Towards the bottom left of the Edit Plan Settings window, click on Change advanced power settings. A popup window called Power Options will appear.

Step 3: Among the options enlisted, locate and click on Display. A number of listings under it will show. Now, click and then set both options under Enable Adaptive Brightness to“Off”.

Step 4: That’s all you need to do to modify the PC’s power plan to resolve the “Windows 10 brightness not working” problem. Now, restart your PC and then check again if the issue is fixed. Hopefully, it was. If not, then too bad! I guess the only other option you have left is to contact the computer’s manufacturer.
1. Is it necessary to use a Blue-ray screen?
It’s not necessary but highly recommended that you use a Blue-ray screen. The reason being that a Blue-ray screen filters off blue light that’s emitted from computer screens hence protecting your eyes from associated problems such as cataracts, blurred vision, etc.
2. How to turn on screen night mode in windows 10
Press the Windows button then click on the Settings icon located on the bottom left of the popup window. Alternatively, you can just type settings in the search bar then hit Enter. From the options on the settings window, select system then on the next screen, select Display. In the middle pane of the next window, toggle Night light then proceed to Night light settings to set your preferred time intervals for night mode.