Should you clear TPM when resetting or reinstalling Windows 10/11? Is it safe? Delve into this article to uncover the reasons behind TPM prompts during resets and the safety considerations associated with clearing TPM in these scenarios. Trusted Platform Module (TPM) stands as a pivotal hardware component embedded in modern computing devices, offering a layer of security by storing sensitive data like encryption keys, passwords, and certificates. Its functionality extends to facilitating biometric logins, enabling encryption for data via BitLocker, and supporting various applications such as email clients, web browsers, and other security-centric features.
However, scenarios may arise where clearing the TPM becomes necessary, prompting the potential loss of stored keys associated with crucial data, including login PINs, smart card information, and other secured credentials. The decision to clear TPM should be approached cautiously, understanding the implications of data loss and the need for comprehensive backups of secured information before initiating the process.
Many users, especially when reinstalling Windows 10 or 11, encounter prompts indicating a need to clear TPM due to a “configuration change” request. This prompts questions regarding the safety and necessity of clearing TPM in such instances, igniting debates across various forums.
In this comprehensive guide, we delve into TPM technology, its significance in modern computing, the implications of clearing it on Windows systems, and step-by-step instructions to perform the process safely and effectively.
What is TPM?

Trusted Platform Module (TPM) is an integral microchip integrated into a computer's motherboard, notably found in Dell systems, dedicated to bolstering hardware-based security measures. Its primary role revolves around securely generating cryptographic keys, including a unique and confidential RSA key embedded during production.
TPM ensures robust cybersecurity, functioning as tamper-resistant storage for cryptographic artifacts like user passwords, encryption keys, and certificates. Its capabilities extend beyond key generation to safeguard protocols and enable security features like BitLocker drive encryption on Windows systems.
This chip operates in two modes, 1.2 and 2.0, with TPM 2.0 offering enhanced functionality encompassing additional algorithms, support for multiple trusted keys, and broader application support. Notably, transitioning to TPM 2.0 mandates adjustments in BIOS settings to UEFI mode and requires a 64-bit version of Windows.
Furthermore, TPM facilitates secure protocols and cryptographic operations while boasting multiple physical security mechanisms to thwart tampering attempts by malicious software, ensuring the integrity of the security functions it provides. TPM is a cornerstone technology for hardware-based security, safeguarding sensitive data and enabling various security features within compatible computing systems.
Why Clear TPM on Windows?
Clearing the TPM on a Windows system can be crucial for several reasons, each contributing to security and functionality and ensuring a smooth transition or troubleshooting process:
- TPM and BitLocker Interaction: When resetting or reinstalling Windows 10/11, TPM clearance is often prompted due to the interaction between TPM and BitLocker encryption utilities. Clearing TPM ensures the new system can effectively utilize TPM-based functionality after resetting or reinstalling.
- Reduced Functionality Error: Users encountering errors like “TPM is ready for use, with reduced functionality” in the TPM Management console might require TPM clearance to resolve such issues, allowing the TPM to function optimally.
- Full TPM Functionality: Clearing TPM before installing a new operating system ensures that the new OS can fully deploy any necessary TPM-based functionalities, such as attestation or encryption, without compatibility issues.
- Resolve Authentication and Encryption Issues: Clearing TPM can help resolve authentication problems with Windows Hello or encryption issues with BitLocker. It ensures that TPM-related functionalities work seamlessly, addressing authentication and encryption concerns.
- Preventing Key Extraction: Clearing TPM is recommended before discarding a device to avoid potentially extracting BitLocker keys from the TPM, ensuring data security and privacy.
- Removing Embedded Malware: In instances where malware is suspected, resetting the TPM eradicates any potential malware embedded within it, contributing to system security.
- Privacy Protection: Resetting the TPM before selling a computer safeguards personal information stored within the TPM, including details about drivers and applications installed, ensuring user privacy.
How to Clear TPM on Windows
Method 1: Using Windows Security App
Step 1: Open the Windows Security app by searching in the Start menu or using the Windows + S shortcut, then selecting “Windows Security” from the results.
Step 2: Go to “Device Security” from the left panel within Windows Security.

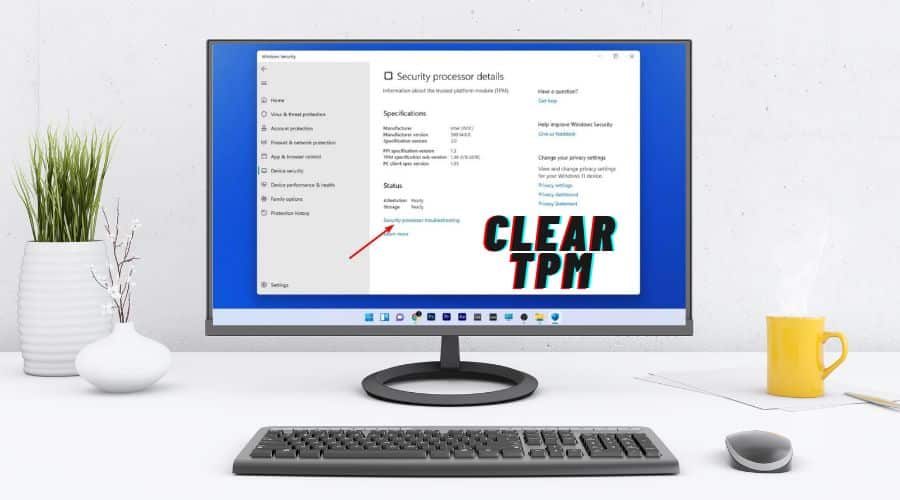
Step 3: Look for the “Security processor details” option under the “Security processor” section.
Step 4: Click on “Security processor troubleshooting” to proceed.

Step 5: Select “Clear TPM” within the troubleshooting options to reset it to default settings.

Step 6: Confirm the action and follow prompts to initiate TPM clearance. Tap on “Clear and restart” to execute the process.

Step 7: During the restart, if prompted by the UEFI to confirm the TPM clearance, follow the on-screen instructions to confirm.
After the system restarts, the TPM will be cleared and automatically prepared for use by Windows 11.
Method 2: Using Powershell
Step 1: Open PowerShell or Terminal by searching for “PowerShell” or “terminal” in the search box, then right-click and select “Run as Administrator” to ensure administrative privileges.
Step 2: In the PowerShell window, enter the command clear-tpm and press Enter. This command will trigger the TPM reset process using the owner authorization value stored in the registry.

Step 3: If you use a PIN to log into Windows, clearing the TPM keys will prompt you to set up a new PIN.
Step 4: After entering the command, restart the system to allow the TPM to be cleared. The command Clear-Tpm resets the TPM, clearing all stored keys.
Using PowerShell to clear TPM keys is a command-line operation that should be executed carefully. Ensure administrative rights, understand the PIN and account password implications, and confirm the action before restarting the system for TPM clearance.
Method 3: Using TPM Management Console
Step 1: Press the Windows + R keys to open the Run command.
Step 2: Type msc, hit Enter or click “OK” to open the Trusted Platform Module Management console.
Step 3: Click “Clear TPM…” in the “Actions” menu in the TPM Management console.

Step 4: If you use a PIN to log into Windows, clearing the TPM keys will prompt you to set up a new PIN. Ensure you know your account password, as it will be required to set up the new PIN.
Step 5: Choose “Restart” and follow the on-screen instructions to complete the process.

Step 6: During the restart, you might be prompted by the UEFI to press a button to confirm the TPM clearance.
Step 7: After the restart, you will be asked to set up a new PIN. Input your account password and create the new PIN.
The TPM Management console allows users to manage TPM settings, including clearing TPM and ensures proper authentication procedures to set up new security features after TPM clearance.
Method 4: Using Bios
Step 1: Restart your computer and press the BIOS key (typically F2 or Del key) to access the BIOS menu during startup.
Step 2: Once in the BIOS, switch to the “Security” tab.

Step 3: Look for the “Clear TPM” option within the Security tab and select it. Choose “Yes” from the prompted options to confirm TPM clearance.

Step 4: Switch to the “Exit” tab, select “Save Changes and Exit,” and confirm by choosing “Yes.”

Step 5: After the computer restarts, you will likely be prompted to set up your PIN on the login screen, indicating that the TPM has been successfully cleared.
How Safe is it to Clear TPM on Windows?
Clearing the TPM on Windows is generally safe if performed under the right circumstances and clearly understanding its implications. However, it is crucial to consider several factors before initiating TPM clearance:
- Backup Important Data: Clearing the TPM often involves deleting encryption keys and sensitive data. It is vital to back up any critical data encrypted or secured by TPM before performing the clearance.
- Understanding Consequences: Clearing the TPM will result in the loss of cryptographic keys, which may impact functionalities such as BitLocker encryption, Windows Hello authentication, and other TPM-dependent security features. Ensure you are aware of the potential repercussions.
- Reason for Clearance: Clearing TPM is recommended for specific scenarios, like system resets, reinstallation of the operating system, troubleshooting TPM-related errors, or preparing a device for resale. Ensure the clearance aligns with your intended purpose.
- Security Concerns: In instances of suspected malware or security compromises, clearing the TPM can be a viable step to eliminate potential threats embedded within the TPM chip. However, it is essential to address the underlying security issue comprehensively.
- Device Ownership: Clearing TPM before transferring or discarding a device helps prevent the potential extraction of sensitive information, like BitLocker keys, enhancing data security and privacy.
- Follow Manufacturer Guidelines: Always follow manufacturer-recommended procedures and guidelines when clearing TPM. Some systems might have specific steps or prerequisites for TPM clearance.
FAQs
Q. What happens if I clear TPM without backing up data?
Clearing TPM erases encryption keys and associated data. Without backups, data encrypted or protected by TPM becomes inaccessible, potentially leading to data loss or the inability to decrypt content.
Q. Can I clear TPM remotely on a networked device?
TPM clearance is typically performed locally on the device due to security protocols. Remote TPM clearance might not be feasible to ensure the secure execution of the process.
Q. Can clearing TPM cause system instability or affect performance?
Generally, TPM clearance does not directly impact system stability or performance. Adhering to proper procedures helps maintain system integrity post-clearance.
Q. Can I re-enable TPM after clearing it?
Yes, TPM can be re-enabled through BIOS settings or relevant security options on the device post-clearance if TPM functionality is needed.
Conclusion
Clearing the Trusted Platform Module on Windows is vital for addressing security concerns, system resets, or preparing devices for resale. This process requires careful attention to data backup before clearance and understanding the potential impact on system access post-clearance. Following manufacturer guidelines and seeking assistance for uncertainties ensures a secure and seamless clearance experience. TPM clearance underscores the importance of data protection and system security, requiring a cautious approach to preserve data integrity and sustained performance.