Have you ever thought of assembling your computer? Well, it is not complex, you just need to buy all the relevant hardware that you will use to assemble the computer. Not only is it cheaper, but you can also enjoy the fun of assembling a computer.
Before doing any computer assembly, you will need to have all the items. If you start from scratch, you will need the processor (CPU), computer case, optical drive, memory- RAM, power supply, SATA cables, motherboard, processor fan, case fan, hard drive, and screw drive.
Make sure you buy all the items from the right manufacturer. This will ensure that you assemble them perfectly to make the computer function well. You will also need to have a toolkit of all the handy tools you need. Try to be cautious not to use the wrong tool for a certain function.
- Case handling
To install, you will need to open the computer case by removing the side panels. Try and locate the screws that hold the side panels in place and remove them. To remove the panel, you will first need to slide it back then lift away the case.
While assembling the case, you will need to remove any parts of the packaging materials, remove the optical drive cover, and ground yourself.
1. CPU Assembly

The Intel and AMD CPUs have marks. The Intel has two small gaps, while AMD has a small triangle. This mark is vital as it assists you in installation. This helps you to distinguish the direction of placement.
In this, you will need to locate the CPU socket holder. This is normally located on the motherboard. After that, open the CPU socket cover. Then line up the notches or the triangle on the corner of the CPU.
This is why you need to distinguish whether it is an AMD or intel. Then gently place it straight down the motherboard socket to seat the CPU.
2. Memory Module Installation

This is how you can install RAM on your computer device.
Step 1: First, open the clips at both ends of the RAM mounting slots.
Step 2: Make sure to extract your RAM from its anti-static bag and hold it by its edges. If your open slot is more than one in the motherboard, ensure the lowest numbered slot is filled first, or use a slot that is close to that filled slot.
Step 3: Align the notch on the RAM stick with the mounting slot.
Step 4: After you are done, place the RAM and press it firmly down into the slot. Use a thumb when pressing the module in the slot and apply pressure on it until you hear a click. Both side ejector clips should snap around the modules.
Step 5: The tabs should automatically close to secure the RAM in place. You can then install all the other RAM sticks using the same method.
3. Hard Disk Installation

Before installing the SATA hard disk, confirm the type of SATA hard drive your PC uses. To get this type of information, search for it from the manufacturer's website. The most suitable location for mounting your hard drive is on the lower front, close to the intake fan of your PC.
Step 1: To mount the new SATA drive, you need to connect the SATA data cable to the motherboard. On the other hand, for the M2, you will need to locate the M2 slots on the motherboard. The slot can be found between the CPU and GPU on the lower side of the motherboard.
Step 2: Find the correct drive to install the driver. If you find it hard to locate, read the documentation.
Step 3: Slide the drive into place until the screw holes on the sides are lined up with the case holes.
Step 4: Install the screws.
4. Radiator installation

The radiator's position in the PC case depends on the; size, hardware, and fan mounting holes you have installed. Make sure that the radiator and fans fit into the chassis.
The chassis has standard fan mounting holes. Additionally, there is the open-air radiator installation and water-cooled installation.
Step 1: It’s normally advisable to install the fans first on the radiator. This is because it's easier than when the radiator has been installed.
Step 2: Orient the fans correctly to push air through the radiator. There is normally an arrow that shows the direction of airflow in the fan. Then secure the radiator fans using a crisscross pattern to screw them into their place.
Step 3: Hold and align your radiator in the correct position. Next, feed the fan cables in the nearest cutouts of the case and screw holes lined up with the rivets on the case.
Step 4: Screw the radiator into its position at the middle end or either end. You can take the weight of the cooler and take away your hands.
Step 5: Finally, screw in all remaining screws and don't tighten them up yet. This is because you can reposition/slide the cooler whenever you feel the tubing can touch the rear case fan. As soon as the cooler is in the perfect place, tighten up the screws.
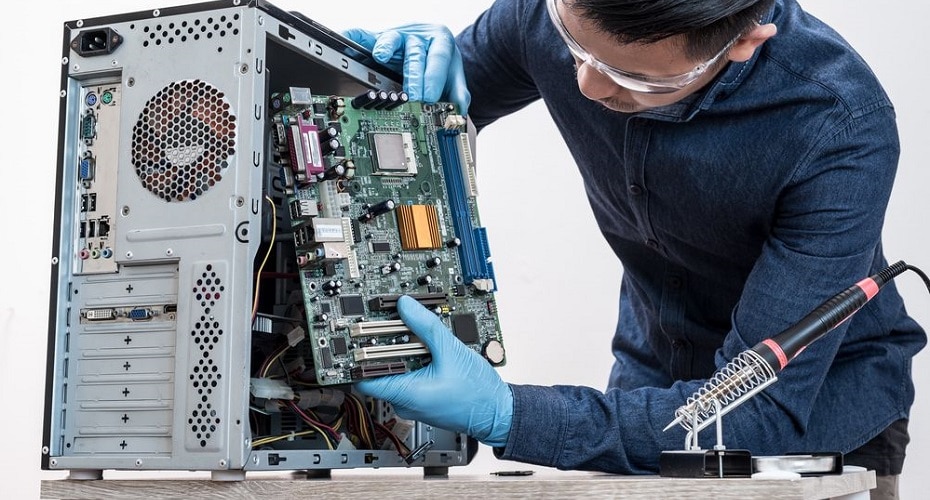
5. Motherboard installation

After installing the above components, you can install the motherboard to the chassis. First, install the I/O baffle, which is behind the chassis.
Step 1: First, install the I/O baffle; its function is to ground the external equipment to prevent static electricity. Some motherboards weld the I/O baffle; hence, install it directly on the chassis hole.
Step 2: Punch out the rear I/O plate from the case and replace it with the motherboard I/O plate. Then fasten the motherboard on top of the mounting standoffs.
6. Power installation

The wattage of the power supply can roughly refer to the following formula:
Step 1: Open the chassis panel and check if there is an air inlet under the case. If yes, point the air inlet of the power supply downward; if not, turn the air inlet upward.
Step 2: Put the power supply in from the side and screw to fix it.
Step 3: On the other hand, when there is a baffle on the outside of the chassis, you will need to remove it first.
Step 4: Then install the baffle on the power supply first, then push it in from the back of the chassis, and finally screw on the fixing screws.
7. Power supply line connection

Step 1: First select the power supply line of the motherboard from the power supply (usually 20+4pin), and connect it to the jack of the motherboard
Step 2: Then connect the power supply line of the CPU (usually 4+4pin) and the power supply line of the graphics card (6+2pin) in turn
Step 3: If you have an additional mechanical hard drive or solid-state drive, connect the SATA power supply line.
8. Graphics card installation

First, estimate the approximate location of the graphics card, and then remove the metal piece on the back of the chassis.
Step 1: Open the buckle of the PCI-E, estimate the position where the graphics card is inserted, and remove the baffle on the outside of the chassis.
Step 2: Insert the graphics card into the PCI-E interface. The graphics card should be inserted close to the CPU. Otherwise, the speed and performance of the graphics card may not be fully utilized.
Step 3: Use fixing screws to fix the graphics card on the outer baffle.
9. Power supply detection

To detect the power supply on your PC, you need to turn on the power supply and press the switch button.
On your screen, it will display a black screen with white characters in English prompt;
This clearly shows you that the computer does not have a boot drive, and there is no system on the hard disk. When these words appear, it means it installed the hardware in place, and you can install a system.
10. Install the system

Before installing any operating system, e.g., Windows, always check the computer hardware to see whether it is compatible with the chosen version of Windows.
Step 1: Enter the BIOS or CMOS setup. Every computer has its unique way of opening up the CMOS setup. The setup allows you to configure the basic setting of your computer. Set the computer boot order.
You can boot your device from a disc when you have set a DVD, CD, disc drive, or USB drive. Bios should recognize the disc in the drive and add it to the list.
Step 2: Save the changes made in the Bios setting. Once you update the BIOS order, you can start the Windows installation process.
Insert the USB thumb drive back in the computer or the Windows disc inside the CD/DVD drive.
Step 3: Turn on or restart your PC. At the start-up of your computer, you will see a similar message of; press any key to boot from CD. On your keyboard, press any key to boot your computer from the Windows disc or the USB drive.
During the Windows installation process, answer the prompt questions with a YES or any appropriate option.
Step 4: Select the main partition C drive or unallocated partition when asked which partition your Windows OS should be installed. Format the hard disc when necessary.
When asked to erase all the contents in the hard drive, it is recommended to select this option during the installation.
Step 5: During the installation process, you will experience several computer restarts. Always select the YES option when prompted to restart.
When the installation process ends, you will see the Windows configuration screens. These screens will need you to select:
- The time zone of your location,
- Account name you will use to access the windows.
- The preferred language
When the installation of the windows ends, it will direct you to log in.
Conclusion
That’s the best way that you can use to assemble the computer. However, remember to be careful when installing.
Do not bend the metal pins of the CPU or damage the metal contacts of other hardware, which will affect the functionality of the computer. A computer is essential, and you need to connect it correctly.