Audiodg.exe is a components of the Windows files system. In the Task Manager window, this process is normally represented as Windows Audio Device Graph Isolation. While it’s a legitimate system file in windows, some viruses may masquerade as Audiodg.exe. Read on to find out more about audiodg.exe…..
The audiodg.exe process is a legitimate Windows system file represented as Windows Audio Device Graph Isolation in the Task Manager. Its main function allows system audio services to run independently of the user profile. Simply put, audiodg.exe supports audio drivers in different login sessions from the locally logged-in Windows users.
It’s essential in hindering content or plugin modifications by other system or non-system applications. Audiodg.exe is located in the C:\Windows\System32 folder.
In this article, we have discussed what audiodg.exe is and whether or not it is a virus or malware. Keep reading to find out….
What is Audiodg.exe?

The audiodg.exe process is an integral system file in windows. In the Task Manager, it is represented as Windows Audio Device Graph Isolation. The main function of Audiodg.exe is to allow concurrent running of sound drivers in separate logged-in user sessions.

Like all legitimate system files, the audiodg.exe is located in the C:\Windows\System32 folder. As such, it is not a virus or malware. However, some viruses share the same file name with this legitimate Windows system file.
Is Audiodg.exe a Virus or Malware?

Usually, audiodg.exe is a legitimate Windows system file that is tasked with allowing for concurrent running of audio drivers in different logged-in user sessions.
In the Task Manager, this system file is usually represented as Windows Audio Device Graph Isolation. Even though it is a genuine system file, there are malware variants of audiodg.exe that may infiltrate your PC from the web or other sources.
Examples of Viruses with audiodg.exe file name

As mentioned earlier, there are different malware variants of the audiodg.exe system file. These virus versions normally masquerade as genuine files and even share the same file name to avoid detection by Windows firewall or antivirus programs.
Below are examples of viruses that have the same file name as audiodg.exe:
- R002CODBS20
- CYE
- Trojan:Win32/Tiggre!rfn
- PUA:Win32/CoinMiner
How to determine if audiodg.exe is a genuine windows program file or virus
Because there are malware variants of the genuine audiodg.exe file, it’s always advisable to check and verify the genuineness of the file on your PC.
There are two main methods to go about it. These include:
1. Identifying location of the audiodg.exe file
You can use the Task Manager to check the file location of audiodg.exe. To do that, follow the steps below:
Step 1: Right-click in the Start button, and then from the quick access menu options, select Task Manager.

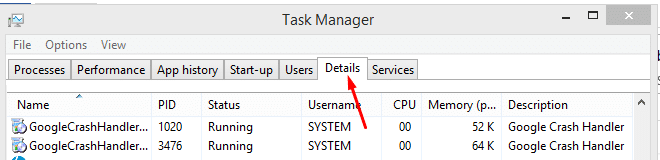
Step 2: Click on the Details tab on the Task Manager window. From the list of running programs, locate Windows Audio Device Graph Isolation.
Step 3: Right-click on the program file and choose Open File Location from the menu options. Confirm that the file path points to this file location: C:\Windows\System32 folder.


If the audiodg.exe on your PC is located elsewhere, then it’s likely a virus program disguised as a legitimate system file.
2. Check the digital signature of the audiodg.exe file
Besides checking the file location, you can also verify the legitimacy of a file by checking its publisher or digital signature. Follow these steps to establish the digital signature or publisher of the audiodg.exe file:
Step 1: Press Ctrl + Shift + Esc to launch the Task Manager.
Step 2: Click on the Details tab on the Task Manager screen and then scroll through the running programs till you locate Windows Audio Device Graph Isolation.

Step 3: Right-click on the program File And choose Properties from the menu options. A new popup screen will appear.
Step 4: On the new popup screen, click on the Digital Signatures tab and then look under the Name of Signer to see the publisher of the audiodg.exe file on your PC.
 Legitimate audiodg.exe system files are published or signed by Microsoft Corporation. Any other name should be cause for worry of a potential virus attack.
How to Disable, Remove or Uninstall Audiodg.exe.
Audiodg.exe is a legitimate system file. As such, it should never be disabled or removed from the PC unless it’s corrupted. In such a case, yon follow these steps to uninstall or remove it from your PC:
There are two ways to go about it:
1. Run the file uninstaller
All software programs come with an accompanying installer and uninstaller. The uninstaller can be located at different directories such as:
Or
2. Use Add or Remove Programs feature
This option usually applies if the audiodg.exe file was installed on a PC using the Windows Installer. If that’s the case, proceed as follows:
Go to System Settings > Add or Remove Programs> Search bar> search for “audiodg.exe or Microsoft Windows.”

Once you have located the program file, go ahead and click on it and choose Uninstall Program.

The Windows Audio Device Graph Isolation, along with audiodg.exe, will then be removed from your computer.
Audiodg.exe errors can occur for several reasons, including issues with corrupted system files, missing registry entries, improperly configured hardware, or even malware infections.
There are several methods to fix this issue, from resetting the sound card settings to updating the audio driver.
What Causes Audiodg.exe High CPU Usage?

Sometimes, audiodg.exe may seem to use a lot of CPU resources. There are a number of reasons for this. Below are the common culprits associated with the high CPU consumption of Windows Device Graph Isolation:
1. Audio enhancements/ effects.
Audio enhancements cause high CPU usage while playing audio files in Windows Media Player. This problem is also reported in other media players like VLC. Audio enhancements work by processing audio files as they play, thus leading to a sizeable rise in the utilization of the CPU.
2. Volume adjustment.
The volume adjustment causes audio processors to be optimized for specific sound cards and drivers, which means any other software can also access these options. Volume adjustment allows an application to apply effects directly to the audio stream without re-encoding the entire file. This has been associated with increased CPU utilization.
3. High audio sample rate
In a 44 kHz recording, there are 44,000 samples taken every second. If that recording is increased to 88 kHz, there are 88,000 samples per second.
An increase in the frequency of audio sampling increases the dynamic range of the audio file and the CPU resource allocation.
4. Outdated or incorrect audio drivers
If you hear crackling sounds or distorted audio, it is caused by an outdated driver. Your computer's sound card requires a compatible audio driver to output Sound. Older versions of Windows may not support the latest audio drivers, and new ones might not be installed when you update your operating system.
Computers with outdated or incompatible audio drivers are more than likely to experience increased CPU usage due to this system file.
How to Fix Audiodg.exe High CPU Usage
Fix 1: Disable audio enhancements/ effects
By disabling the audio enhancements and effects, you will be able to reduce audiodg.exe CPU usage significantly. Follow these steps to disable audio enhancements:
Step 1: On the search bar, type Change system sounds.

Step 2: On the search results screen, click on Open on the right-hand pane to launch the sound window.
Step 3: Click on the Playback tab on the Sound. Go ahead and select the Speaker icon, right-click on it, and select Properties from the menu options.

![]()
Step 4: From the Speaker Properties window, click on the Enhancements. Right below that, tick the checkbox for Disable all enhancements.
Step 5: Press Enter or click Ok to save the changes.

Fix 2: Disable automatic volume adjustment.
You can also reduce audiodg.exe high CPU usage by disabling volume adjustment on your PC. Here’s how to do it:
Step 1: On the search bar, type Change system sounds and double-click on the top option in the search results window.
Step 2: On the Sounds window, click on the Communications.

Step 3: From the radio options, select Do Nothing and then click OK to save the changes.

Fix 3: Change the audio sample rate in windows.
As aforementioned, a high audio sample rate leads to high CPU usage. To fix this problem, all that you need to do is reduce the audio sample rate. Here are the steps to do just that:
Step 1: On the windows search bar, type Change system sounds.
Step 2: Double click on the icon at the top of the search results window to open the Sounds.
Step 3: On the Sounds screen, click on the Playback tab, and then on the context menu, right-click on the currently active Speaker icon and select Properties from the menu options. Properties window will appear.
![]()
Step 4: Click on the Advanced tab on the Properties.

Step 5: On the Sample rate dropdown, choose a lower value and then click Enter or OK to save the changes.

Fix 4: Update audio drivers via the Device Manager
You can also reduce the CPU usage of audiodg.exe via the Device Manager utility. To do that, follow these steps:
Step 1: Right-click on the Start button and select Device Manager from the quick access menu options.

Step 2: On the Device Manager screen, scroll till you locate and then click Sound, video, and game controllers.

Step 3: Right-click on the sound card, and then from the menu options, choose Update driver.

Step 4: A window will appear asking you, “How do you want to search for drivers?” Choose the first option for Search automatically for drivers.

Step 5: Once that’s done, windows will automatically search for and install the necessary audio drivers.
How to Resolve Audiodg.exe Error.
There are a number of methods for resolving audiodg.exe related errors. Below, we have captured two of the most common solutions….
Solution 1: Via Sounds window
To resolve audiodg.exe error via the sounds window, proceed as follows:
Step 1: Right-click on the Speaker icon on the taskbar and select Sounds from the menu options.

Step 2: Click on the Playback tab, then select the Speaker icon with a green checkmark next to it.
Step 3: Next, click on Properties to open the Speaker Properties window.

Step 4: Click on the Enhancements tab and then tick the checkbox for Disable all Enhancements. Click OK to save the changes.

That should fix any audiodg.exe errors on your PC. To confirm whether or not the issue was resolved, press Ctrl + Shift + Esc and check for the amount of CPU resources allocated to audiodg.exe on your system.
If you’re still seeing error audiodg.exe error alerts after making the change via the Sounds window, try the next solution.
Solution 2: Via Device Manager
You can also fix audiodg.exe related errors via the Device Manager. To do that, proceed as follows:
Step 1: Right-click on the Start button and select Device Manager from the quick access menu options.
Step 2: On the Device Manager window, scroll to locate Sounds, video, and games controllers. Usually, there are two driver options enlisted here. There could be more options, depending on your device.
Step 3: Right-click on the sound driver and choose Uninstall.

Step 4: Once it’s uninstalled successfully, restart your PC to save the changes.
FAQ
Q. How do I stop the audiodg.exe process?
You can stop audiodg.exe by right-clicking on the speaker icon in the taskbar and choosing Sounds. Click on the Playback tab > Speaker icon with green checkmark > Properties. Click on the Enhancements tab and tick Disable all enhancements checkbox and then click OK to save the changes.
Q. Is audiodg.exe a virus or malware?
No, it is not a virus or malware. The audiodg.exe process is an integral system file in windows that allows for concurrent sound drivers in separate logged-in user sessions.
Q. Is Audiodg.exe Causing High CPU Usage?
Usually, the audiodg.exe process uses very little CPU resources. If you notice a spike in CPU consumption related to this system file, it’s likely due to a virus infection. In such a case, you might want to scan your PC with an antivirus program to remove the malicious audiodg.exe program file.