Did you know that it’s possible to move program files from the default installation disk C to another local disk without compromising your PC’s and the application’s performance. Read on to find out how to execute that using third-party tools and windows in-built utility features…
If your PC has too much software in the default installation disk C: Programs Files, then your computer will experience countless problems, including slow processing speeds. To fix this, move some program files to an alternative disk partition.
There are a couple of ways to go about that without having to uninstall and reinstall the programs in a separate drive. In this guide, we’ve highlighted some methods that you can use to get the job done and have your PC back in action without breaking a sweat.
1. Using a Third-Party Tool
There are a number of third-party software that can be used to move programs from one local disk to another. The three main ones include EaseUs Todo PC Trans, Steam Mover, and FolderMove.It’s also worth noting that this softwares can also be used to move programs between computers, besides the usual intra-computer program transfer. For this guide, we’ll mainly focus on EaseUS Todo PC Tran.

Tip: Before using any of these third-party tools to move programs from the default installation drive C to a different local drive, we highly recommend that you back up all your installed programs. That way, you’ll be safe in case something goes wrong.
EaseUs Todo PC Trans
With this software, transferring programs from your drive C to another disk partition is simple and quick. Follow these steps to get the job done in a few simple clicks:
Step 1: The first thing you’ll need to do is download and install the EaseUS Todo PC Trans software. Once installed successfully, go ahead and launch the tool on your PC.

Step 2: Upon launching the app, go to the left pane of the user interface, then click App Migration. Go ahead and click the start button at the bottom of the screen. A window with all the drives on your computer will appear.

Step 3: On the left side of the screen, click on Drive C. On the right-hand side, you will see tabs for program Name, Size, and Migration Suggestion. Under the Name tab, you’ll see a list of programs on your computer’s drive C. Tick the programs you wish to transfer.

Step 4: Once you’ve selected the programs to transfer, go ahead and choose the drive where you want to transfer them. To do that, click on the Triangle Icon, then at the bottom of the same window, click Transfer. Moving all the selected programs to your preferred local drive will then commence.

Step 5: The transfer phase of the entire procedure normally takes a few minutes but may last a little longer for large program files. Be patient till the transfer process is completed successfully. When it's all over and done, you may want to restart your PC to save all the changes accordingly.
2. Windows 10 Migration Utility Features
You can also move a program from the default installation drive C to an alternative drive using windows' in-built utility features. There are two ways to go about it:
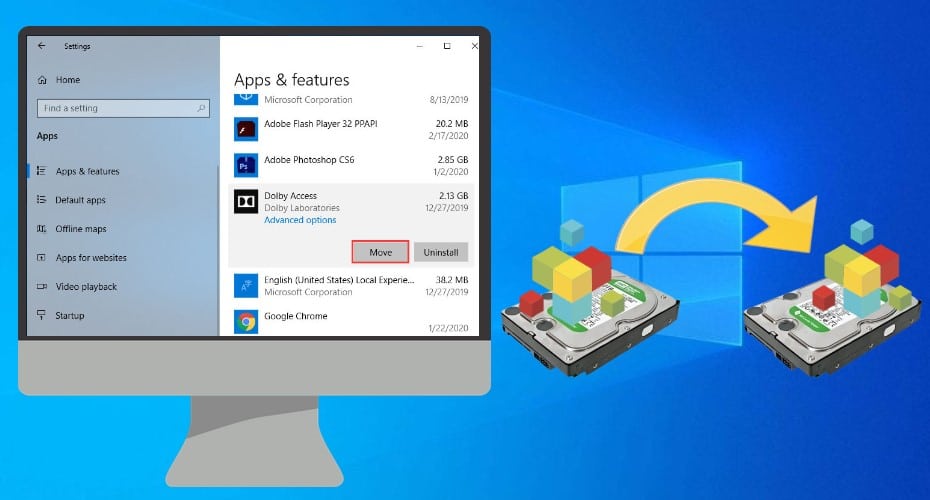
i. Via Apps & Features settings
Here are the steps to follow under this option.
Step 1: Press Windows + I or type settings in the search bar, then click on the Settings app icon. The settings window will appear with a list of some 14 options. Select the Apps option. Here, you will be able to see all the programs installed on your PC. You can use the Sort by feature to choose particular program files. Also, you can use the Filter by function to target only programs installed on drive C or any other disk partition on your PC.


Step 2: Once you have identified the program(s) that you intend to relocate, select it, then click on Move.

Step 3: A pop-up dialog box will appear, prompting you to choose a destination drive for your selected program. From the dropdown box, choose your preferred local disk. Next, click “Move” on the same dialog box to initiate the transfer process.

Step 4: Wait a few seconds or minutes for the program to be migrated successfully.
ii. Via Storage Settings
You can also relocate a program from drive C to another drive via storage settings. Here’s how to do that:
Step 1: Press Windows + I keys simultaneously or type storage settings in the search bar. The storage settings window will appear.

Step 2: On the right-hand side pane of the storage settings screen, click on Apps & features to access all the programs installed on your PC. You can use Sort and Filter by features to find the program(s) you wish to relocate.


Step 3: Select the program, then click on “Move”. A dialog box will pop up, prompting you to select a transfer location. Choose your preferred destination disk from the dropdown box, then click “Move” on the dialog box.
The selected program will then be moved from the default installation drive C to the selected disk.
Step 4: The transfer typically lasts a few seconds or minutes. Wait patiently till the process is complete.
Tip:
- Only programs with the Move option can be relocated to an alternative disk using windows settings.
- Programs with only the option to Modify can’t be moved to a different installation drive.
3. Uninstall Reshipment
Compared to the previous two methods, this one is the simplest. However, the entire process of uninstalling and reinstalling the program may be comparatively lengthier. Here are the steps for transferring a program from disk C using this method:
Step 1: In the search bar, type the control panel, then click on the control panel icon to access it.

Step 2: Under All Control Panel Items, select Programs and Features. A window with all the programs installed on your PC will appear.
![]()

Step 3: Select the program you want to remove from drive C. Right-click on it, then choose the only option available; uninstall/change.

Step 4: Windows installation/ uninstallation wizard will request your permission before proceeding with the process. Click OK to proceed with the uninstallation process. Wait till the program is successfully removed from drive C before proceeding to the next step.
Step 5: Next up is the reinstallation of the program, but this time on a different local disk. Install the program from whichever source you prefer – online download or from an external storage device.
Tip! Remember to install the program on a different drive, not drive C.
4. Using Registry Migration
Tip! Be very careful when editing the registry. Any errors may severely impair the overall performance of your PC and may even require reinstallation of the operating system.
Apart from the methods mentioned above, it’s also possible to move programs from the default installation drive C to another disk partition using registry migration. The entire process uses both command prompt and registry editing utility features. Here’s how the method works:
Step 1: Locate your preferred destination drive, for instance, disk D, and in it, create a folder called Program Files (x86).
Step 2: For this step, we’ll use the command prompt utility.
To do that, type cmd in the search bar. The command prompt app will appear. On the right pane of the search results window, select Run as administrator.
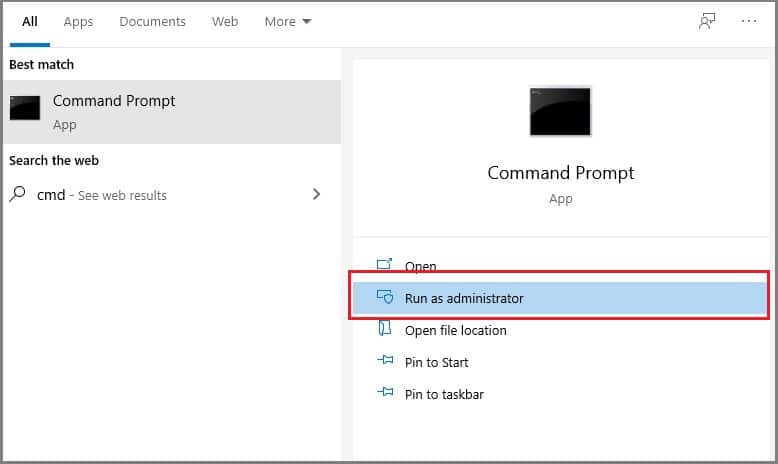
Step 3: On the command prompt user interface, type the following command, then press enter after each:
After that, you can comfortably exit the command prompt app because we won’t need it anymore for the rest of the steps.
Step 3: Launch the registry editor by pressing Windows + R keys simultaneously. The Registry Editor window will appear.

Step 4: Locate the following folder paths:
For Windows 10 users:
For Windows 7/8/8.1 users:
Once you have located the folder path, you’re almost done. One more step, your selected programs will be migrated to the destination drive, e.g., drive D.
Step 5: Under the editing string popup window, for the value name known as CommonFilesSDIR (x86), change the subkey from C to D or any other letter that conforms to the destination drive where you created the Programs Files (x86) folder.
Step 6: Congratulations! You’ve successfully finished moving a program from the default installation drive C to another drive using the registry migration method.
5. Using Directory Link Option
This method is very closely related to the Registry Migration method, only that you won’t have to edit any registry values directly. Here’s how it works:
Step 1: Head over to the default installation drive C, then locate the program you want to relocate. You can find software under C:\Program Files\your target program name, e.g., Realtek.

Step 2: Once you locate the program, copy the target program folder, then go to the destination drive (e.g., disk D) then paste it therein.


Step 3: After copying and pasting the folder from disk C to, let’s say, disk D, remember to delete the original program folder from drive C.

Step 4: All you need to do is run the newly relocated software and see whether it performs optimally in the new disk partition.
The Cleanup Registry
The cleanup phase comes last after migrating an application from the default installation disk C to another disk partition. It entails cleaning up the registry by removing any program elements that aren’t meant to be there -in this case, the relocated program(s). The idea is to eliminate potential conflicts that may arise during the execution of the migrated program(s) from their new location. Head to the registry and remove any program leftovers following the application migration to an alternative local drive.
1. Does migrating the software affect the stability of the program?
The answer to this is both Yes and No. Yes, in the case of migrating software to a different target application or system with incompatible codes. Also, there can be serious program stability issues if the program is moved to a disk with bad sectors. No, in the case of software migration to a different local drive within the same hard disk, assuming the hard drive is in good shape.
2. Which programs cannot be migrated?
You can virtually migrate all programs. If the process isn’t supported by Windows inbuilt migration utility, consider using third-party software to get the job done.
3. How do I change the default installation path?
Press the Windows key, click the start button, or click on the search bar, then click on the settings icon. The Settings window will appear with a number of options. From the settings window, select the system. On the left pane of the next screen, click on storage. Within the same window, under more storage settings, click on change where new content is stored.
A new window with the name “change where new content is saved” will pop up. From the dropdown menus, choose your preferred default installation drive for apps, documents, music, photos and videos, new movies, and TV shows.