Are you having an issue with your external hard drive not showing on your computer when you insert its cable through the USB ports? Well, you can use these methods to modify the issue. However, you need to use the methods one at a time to ensure you don’t mess up.
An external hard drive is essential if you want to store more data from your computer. At times, your internal hard disk may not be enough to save all the important data. Hence, you can use a removable drive to save them.
However, before you transfer any data to your removable external hard drive, ensure your computer detects the hard drive. Also, before deleting or formatting your hard disk, ensure you have a backup of the significant information that you don’t want to lose.
1: Provide Sufficient Power Supply

Some external hard disks need to start with a high voltage. If you plug in the external hard drive through the Notebook’s USB port, the power supply may be insufficient. This may cause it to fail to operate normally, especially the HDD hard disks.
Therefore, you will need to provide a sufficient power supply. At the same moment, you need to ensure there is no fault in your power supply transmission.
Also, check the advanced power settings or use separate power sources. If this doesn’t solve the issue, you can try another method.
2: Replace the USB Interface

In this, you will need to use other USB devices to connect to the interface to see if it works. If the interface is damaged, try to connect to another USB interface.
You may sometimes be using a bad USB that isn't connecting perfectly to your hard disk. Hence, you can try to use or purchase an alternate one compatible with your USB ports and hard drive.
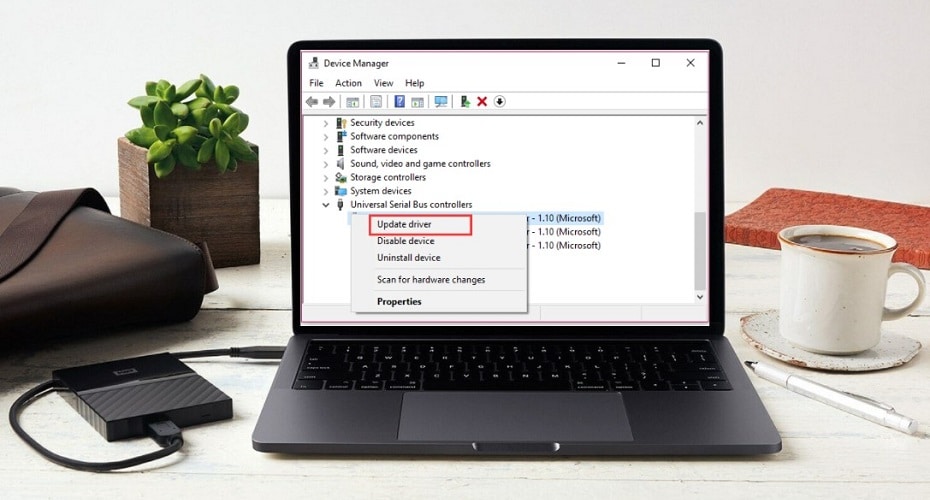
3: Update USB Drivers
The other method is to update the USB drivers.
Step 1: Click the Windows + X buttons simultaneously.
Step 2: On the drop-down menu that will appear on the left-hand side of the Windows screen, click on “device manager.”

Step 3: On the device manager screen, click on “Universal Series Bus Controllers” to expand it. You will be able to see the various USB options.

Step 4: Right-click on the specific USB device and click “Update Driver Software.”

Step 5: While updating the USB drivers, follow the right procedure to ensure you don’t mess up.
4: Set up a New Disk
If your external drive is a brand new hard drive, you need to enter the disk management to allocate space. You will need to create a new partition on your hard drive device.
However, the method differs on different devices. For example, how you set up Windows 10 is different from Windows 8.
Step 1: Click the Windows + X button. On the drop-down menu, select “disk management.”

Step 2: On Windows 10, you need to click on the hard disk, right-click and choose “new simple volume.” Then click next and select the size of the volume you want to create your hard disk.

Step 3: However, on Windows 8, you will right-click on the displayed hard disk, then click shrink disk. It will start to process. Remember to input the volume you want to shrink first. The remaining space is what you can now use to create the new hard disk partition.

Step 4: Right-click on the unallocated space and click, create a “new simple volume.” Follow all the steps until you are done. Remember not to select the “format the disk” option.
Step 5: That’s it.
5: Format External Hard Drive
The other method is to format your external hard drive.
Step 1: Click on the Windows + X button, and select “disk management.”

Step 2: On the disk management window, right-click your external hard drive, then click format.

Step 3: However, ensure you back up all the important data/files before you decide to format it.
Alternatively, go to your File Explorer, right-click on the external drive icon, then click format. That will perform a quick disk format to remove any drive errors.
6: Clean up the Disk
There are certain steps that you can take if you want to clean up your external hard disk.
Step 1: Click on the Windows + X buttons. On the menu bar that appears, click “Command prompt (Admin).” This will allow you to open the command prompt as an administrator.

Step 2: On the command prompt window, write “disk part.”

Step 3: After getting the results, write “list disk” to see all the disks and external disks on your computer. Hence, ensure your external disk is plugged in.

Step 4: Type “select disk 1” to select your target external hard drive. Then enter “clean” to clean it up.

Step 5: However, be careful not to wipe out important files.
7: Test the Hard Drive

If your external hard drive is M.2 or HDD, you can try to connect it to the motherboard to see if it works normally. If you don’t know how to disassemble the computer, you can buy this external hard drive box for testing.
This will help to check whether your hard drive is completely functional. At times, if your hard drive is new, you may not be sure whether it is functional or not. Hence, testing can save you a lot of time and stress.
8: Submit for Inspection and Repair

The hard disk may be faulty. Hence, please send it to a professional repair shop for data recovery. This will help prevent you from losing too much data when it starts misbehaving after a while.
However, ensure you consult a good hard disk inspection personnel. Drive corruption may be causing the external drive not to load.
Conclusion
All these methods can solve the issue when your external hard drive is not functioning normally. However, make sure you insert the external drives correctly in your device before assuming it is not working.
Many reasons can lead to an external hard drive not showing, and you shouldn’t fall the victim—all the best as you troubleshoot the external hard disk issue.