
Are you looking for steps to help you change your IP address? We are here to make the process as easy as possible. Here are some easy guides to help you change your IP address in windows 10.
The internet is made up of billions of users. Internet protocol makes it possible for all these devices to communicate. An IP address is used to identify the devices connected to the internet.
Several reasons could cause you to change your IP address. We are going to discuss them in this article. We will also explain different ways you can change your IP address in Windows 10.
Precautions Before Changes
- Back up the current server addresses or settings
Before making any changes, it is crucial to have a backup of the current server settings or address in case something goes wrong and you need to revert to them. The backup process can be automated or manual. YOu should do it as a precautionary measure. You should also test backups, doing comprehensive backup testing.
While you are backing up your data, the server has an option to save your current settings and configurations.
- Must log in to Windows 10 using an administrator account
You can only make these types of changes when you log on as an administrator. The administrator account provides full system control, access to files, and the power to install and software.
Ways to Change the IP Address on Windows 10
As mentioned earlier, you first need to log in to your Windows 10 using an administrator account There are three different ways to change your IP address. We are going to discuss them in detail below.
Methods 1: Using the Settings app to change the IP address in Windows 10
Some conditions may cause you to change your IP address. One reason could be you are working in a big network, and there is a routine to make these changes. We are here to show you how you can do it if you are using Windows 10 as your OS.
Step 1: Open the Settings app.
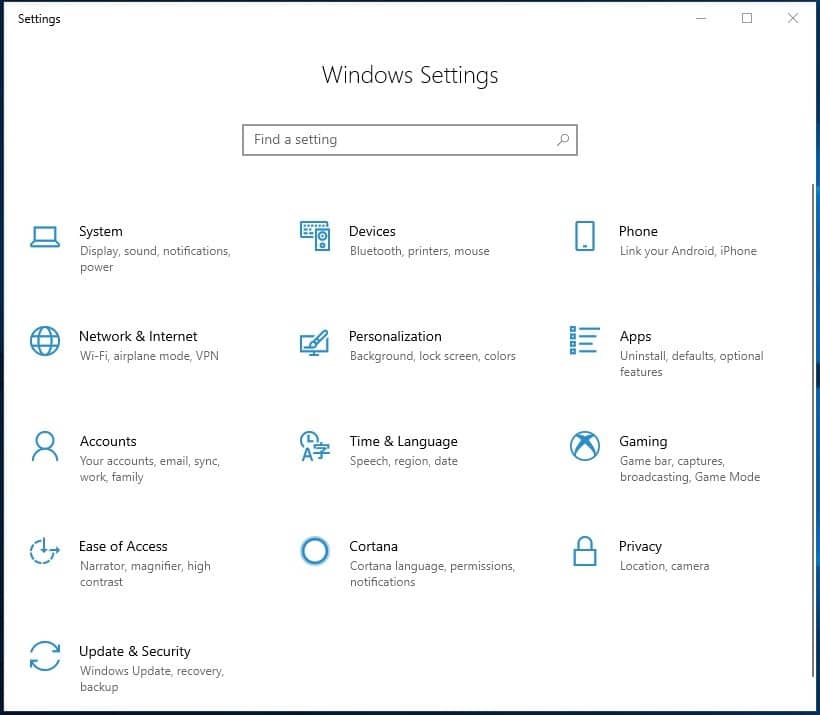
Step 2: Open the Network & Internet category.

Step 3: Select your network type. (Ethernet or Wi-Fi).

Step 4: Click on the name of your network connection.

Step 5: Scroll down to the IP settings section.
Step 6: Click on the Edit option that is under IP assignment.

Step 7: Click on the Edit IP settings to change the IP address manually or select Automatic (DHCP) to change it automatically. The latter is the dynamic IP address.

Step 8: Select Manual to set your Static IP address.

Step 9: Enable the IPv4 and IPv6 switches.

Step 10: Enter the IP address, the subnet prefix length, and the gateway .
.
Step 11: Click on Save to finish the process.

When you choose to use a static IP address, you need to ensure that you key in the correct details. If you don't, you will lose your internet connectivity.
In case this happens, you can change the IP address back to automatic for the connection to happen.
Methods 2: Using the Control Panel to change the IP address in Windows 10
The other way you can change your IP address is by using the control panel. This method is straightforward. We have highlighted the steps you can follow below to do that below.
Step 1: Open the Control Panel.

Step 2: Click on View network status and tasks. You will find it under the Network and Internet section.

Step 3: Click on your internet connection.

Step 4: Tap on Properties in the network window.

Step 5: Select the Internet Protocol Version 4 (TCP/IPv4) or Internet Protocol Version 6 (TCP/IPv6).

Step 6: Repeat the steps to change the one you left in step 5 if you want to change both the IPv4 and IPv6.
Step 7: Select Obtain an IP address automatically to get a dynamic IP address.

Step 8: Tap on OK to save the settings.
Step 9: Close the windows you have opened.
Or
Step 1: Select “Use the following IP address to set as static IP address.
Step 2: Enter the required details (IP address, Subnet mask, and default gateway).

Step 3: Click OK to save the new IP address settings.
Methods 3: Using PowerShell or Command Prompt
We recommend using Windows PowerShell compared to the command prompt because of its additional features. The Power shell can change system settings and automate most of anything on Windows. It's more powerful and flexible than the Command prompt. We are here to guide you on how to use it.
Step 1: Type PowerShell in the search bar of your Windows 10 computer.

Step 2: Tap Windows PowerShell to open it.

Step 3: Type Get-NetIPAddress in PowerShell to see the current IP address.

Step 4: Replace the current IP address with the new one.
Step 5: Replace the prefix length and the gateway. The prefix length specifies the subnet mask of the IP address.
Step 6: Change the DNS Address server by typing Set-DnsClientServerAddress -InterfaceIndex “IndexNo” -ServerAddresses “xxx.xxx.xxx.xxx , xxx.xxx.xxx.xxx”

Step 7: Replace “xxx.xxx.xxx.xxx, xxx.xxx.xxx.xxx” with the server Address.
Methods 4: Using Network Router DHCP Settings
The Windows PowerShell will allow you to release or renew your windows IP address before making any changes to your router’s DHCP settings.
Step 1: Right-click the Start menu.
Step 2: Click on the Windows PowerShell (Admin) option. The Windows PowerShell window will open.

Step 3: Type in ipconfig /release to release your DHCP lease and disconnect.

Step 4: Type in ipconfig /renew to reconnect

Step 5: A new IP address is allocated to your device if it is correct.
Read more,
How to Change IP Address on Mac, Phone & Router
Test Your New Settings
Step 1: Click the Start menu.
Step 2: Tap the settings button.

Step 3: Click the Network & Internet icon.

Step 4: Select Ethernet or Wi-Fi.
Step 5: Click on advanced options.

Step 6: Your New IP address will be displayed next to the IPv4 Address label.

Static vs. Automatic IP Addressing
A static IP address is one that does not change. The static IP address remains the same until the network architecture changes or the device's factory settings are restored. Static IP addresses are assigned by Internet Service Providers.
On the other hand, a dynamic IP address is an address that is assignable on demand. It exists in a large pool of moveable dynamic addresses. Dynamic addresses are assigned by Dynamic Host Configuration Protocol (DHCP) servers.
Therefore, Static IP addresses are configured manually and fixed to your network. However, automatic IP addressing is performed by Dynamic Host Configuration Protocol servers, and it keeps changing.
Why do You Need to Change the IP Address?
- Cannot connect to a network: A malfunctioning router provided an IP address that is already in use. The network will not recognize your IP address because the same IP is already connected. You will have to change your IP address before accessing the network.
- IP address may be banned by a website: The previous user committed an illegal activity like, spamming people or spreading malware. Changing your IP address can help you bypass the website bans.
- The wrong static IP address: configuring your static IP address using the wrong values can prevent you from accessing a network. You can manually or automatically change your IP address to solve this problem.
- Restore the IP: when you are configuring a new router or restoring a home network to use its original IP address range.
Changing your IP address may help you solve a few problems you may encounter while accessing a network. It may happen when the IP address you are currently using is already in use or is banned. The process may be necessary when you are configuring your router settings to improve your network security.
There are many ways to change your IP address. You could do it using the Windows settings app, the control panel, PowerShell, or the command prompt and the network DHCP settings.
If you want to change IP address on other