Find out ways to Renew your IP address to avoid internet connection problems caused when you experience an IP conflict.
When you encounter IP connection problems, your best bet may be to renew your IP address. It refreshes your internet connection and may solve glitches and errors.
There are instances where an administrator assigns the same IP addresses to two different computers in the networks. It could happen when an Internet service provider or the DHCP server assigns a similar IP address to multiple devices. These could result in network conflicts.
The solution for these problems could be renewing the IP address. Doing this resets the IP connection. We are going to give you simple steps to do it on different operating systems. We will also explain why it is a necessary step.
Renew IP Address on Windows 10
Whenever you connect to the internet, the Internet Service Provider assigns an IP address to your computer. Alternatively, when you are using a router, the ISP assigns the IP address to your router. The router then assigns IP addresses to individual devices.
Certain conditions may require you to change your IP address. We are going to use the command prompt to renew the IP address on your Windows computer.
Step 1: Press the Windows key on your keyboard to display the start menu. Search for the command prompt on the search bar.

Step 2: Click on the command prompt to open the application.
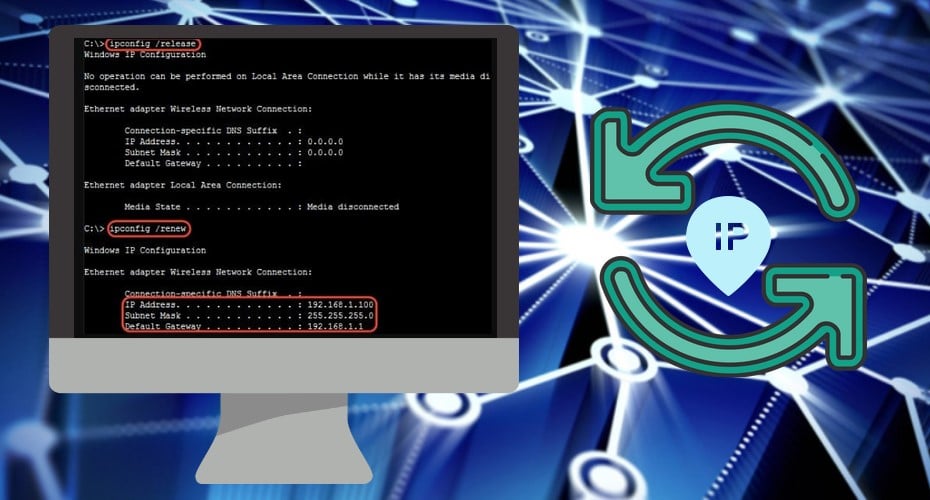
Step 3: Type ipconfig /release at the blinking cursor and click the Enter button. This command will release your computer’s IP address. It will return a prompt that you cannot perform any operation on the Local Area Network.

Step 4: Type ipconfig /renew at the blinking cursor. A prompt containing your new IP address will appear at the bottom of the screen.

Step 5: Type exit to close the application.
For more ways click here.
Renew IP Address on Mac
Your IP address identifies your computer when you connect to a network. The IP address can be assigned automatically using a Dynamic Host Configuration protocol. You can also manually configure the IP address when you enter it into the network panel.
You should regularly renew your IP address if multiple computers use the same DHCP server. It may help resolve most of your connection problems.
Step 1: Click the Apple button on your Mac and choose system preference.

Step 2: Scroll to the Internet and Network section.

Step 3: Click the network you are using. Choose either Ethernet or Wi-Fi connection.

Step 4: Selecting Ethernet/ Wi-Fi will take you to the TCP/IP tab.
Step 5: Click the TCP/IP option.
Step 5: Click Renew DHCP Lease.
Step 6: Select OK.

Step 7: Restart your Mac to complete your changes.
Choosing the DHCP option releases and renews your IP address automatically.
Renew IP Address on Linux
Linux is an open-source operating system. Windows is a commercial OS. Linux allows the user to alter the codes according to their needs.

In Linux, the DHCP client is called the dhclient. The dhclient leases the dynamic IP addresses to the Linux computer for a set amount of time. The dhclient can be triggered to release and renew the IP address from the DHCP server.
- Release the IP address
Step 1: Press Ctrl+Alt+T to open the Linux Terminal.
Step 2: In the Linux Terminal, type ‘sudo dhclient – r' then click Enter to release the IP address.
Step 3: The terminal application will display a prompt that DCHP has released your IP address.
Or
Step 1: Alternatively, you can type ipconfig ethX down (X is the Ethernet adapter you want to release).
Step 2: Press enter.
Releasing your IP address will bring down your network interface.
- Renew the IP address
Step 1: Open the Terminal application on your computer.
Step 2: Type ‘sudo dhclient’ and press Enter to renew your IP address.
Step 3: The Terminal application will display that your IP address has changed from the previous one to the current one.
Or
Step 1: While still in the Terminal from the root account, type ipconfig ethX up.
Step 2: Press enter.
Renewing your IP address will request a new IP address from the DHCP server.
Renew IP Address on Android Phone
Changing your IP address in Android changes your IP address from DHCP to a static one. Using a static IP address allows you to run a mobile web server and to use the phone as a WI-FI camera.
Step 1: Open the Android settings app on your phone.
Step 2: Tap on Wireless and networks.
Step 3: Tap on Wi-Fi.

Step 4: Press and hold the network you are currently connected it. A pop-up menu will be displayed.
Step 5: Tap on the modify option.

Step 6: You will see the login credentials. Press the Advanced settings button.

Step 7: Tap DHCP to change your IP address to a Static one.

You will need to configure your IP address, DNS server, and gateway. Leave the rest of the settings at default and click save.

For other versions of Android, pressing the Forget button will do the trick. You will get an IP address change when you re-enter the password.
Renew IP Address on iPhone
One way to renew your IP address on your iPhone is to restart your device. However, the method is time-consuming. Therefore, we will explore a different procedure.
Step 1: Open the Settings app.
Step 2: Tap the Wi-Fi section.

Step 3: Touch the I icon on the right side of the network to which you are currently connected.
![]()
Step 4: Tap the Release lease button.
Step 5: You will see a pop-up menu. Tap the Renew lease button.

You now have an updated IP address.
Renew IP Address on a Router
The Network router acts as a gateway when your network requests an IP address from an Internet Service Provider. The IP address makes it possible to send and receive internet access.

When you encounter an internet access problem, the Network router cannot obtain a public address. Therefore, it assigns a private IP address in its place. To solve this problem, you may need to renew the Network router's IP address.
Instructing the router to release the IP address makes it lose connection to the internet. All the devices connected to it will also lose internet connection.
You can follow the steps below to release and renew your IP address.
Step 1: Launch a browser and access the Router's setup page.
Step 2: Enter the admin account and password to access the Admin console.
Step 3: Find the WAN section that has the IP address information.
Step 4: Select advanced settings.
Step 5: You will see the release and renew buttons at the bottom of the page.
Step 6: Select the release button. Your router will lose connection to the internet.
Step 7: Select the Renew button to restore the internet connection. You will receive a new IP address.
Step 8: Check if you have a new IP address.
Another option would be to reset your router back to factory settings. Do this in case the release and renew methods do not work.
Bonus
1. Helpful DNS Resolver Commands for Windows.
Ipconfig /flushdns. The command clears the cache of the DNS Resolver for the new IP data to be updated.
Ipconfig /registerdns. The command refreshes all DHCP leases and assigns DNS new names.
Ipconfig /displaydns. The command displays the DNS Resolver cache contents that are currently in it.
2. Repair Ipconfig release renews not functioning.
The IP release and renew commands can only function when your network adapter is set up to obtain IP addresses automatically. Therefore, you need to activate the DHCP option. You can follow the steps below to repair your computer when the release and renew functions are not working.
Step 1: Open the control panel.
Step 2: Select the Network and Sharing Center.
Step 3: Tap Change adapter settings.
Step 4: Right-click your network adapter then and then select Properties.
Step 5: Locate Internet Protocol Version 4 (TCP /IPv4) and click Properties.
Step 6: Select the Obtain IP Address automatically and hit OK.
Why Renew An IP Address?

- You need to renew your IP address when connecting a computer directly to a modem if you have no router.
- When you move a computer from one network to another. A Conflict of IP addresses may occur with other systems in the network.
- When you are experiencing an unexpected network connection problem. Renewing your IP address may solve most of your connection problems.
Whenever you are experiencing network connectivity issues, the solution could be renewing your system’s IP address. A malfunction in the DHCP server or a mistake by the Internet service providers could assign similar IP addresses to multiple devices. Renewing your IP will help resolve such problems.
You may need to renew your IP address when connecting your computer directly to a modem, when moving your device to a new network or when you experience network problems.