Did you know that searchui.exe is the program that runs Windows Cortana? Here’s how to disable this feature temporarily or permanently on your PC…..
What is searchui.exe?

By definition, searchui.exe is an executable background process that allows the PC’s taskbar to function properly.
It used to be part of Cortana, the Windows 10 personal assistant, until the Windows 19 19H1 update in April 2019 when it was removed from Cortana and renamed SearchApp.exe.
The dissociation of searchui.exe (now searchApp.exe) from Cortana has made it considerably low on resource utilization, thus allowing for faster browsing of your PC files, apps, the web, among a host of other computer operations.
It's important to note that searchApp.exe uses other windows processes to manage web searches and file indexing. That makes for very easy file access during searches.
 Tip! It’s possible to disable Seachui.exe (or SearchApp.exe) temporarily or permanently.
 Tip! It’s possible to disable Seachui.exe (or SearchApp.exe) temporarily or permanently.
How to hide the Search Bar

Hiding the search bar utility feature on your PC ensures the Searchui.exe (SearchApp.exe) is paused but enabled. Windows search features will remain active and available; only the search bar will be hidden.
Follow these steps to hide the search bar on Windows 10.
Step 1: Right-click on the search bar (or taskbar) on your PC.
Step 2: On the menu options, hover over the Search option, select Hidden on the right-hand menu.
To enable the Search Bar, right-click on the Task View icon, then on the menu options, select Search then on the next menu, select Show Search Box.

How to stop the search bar process temporarily
When the search bar keeps freezing or becomes unstable for one reason or the other, you may want to end the process to get a quick fix. The following 2 methods can help you stop the Searchui.exe (or SearchApp.exe):
Method 1: Using Windows Task Manager
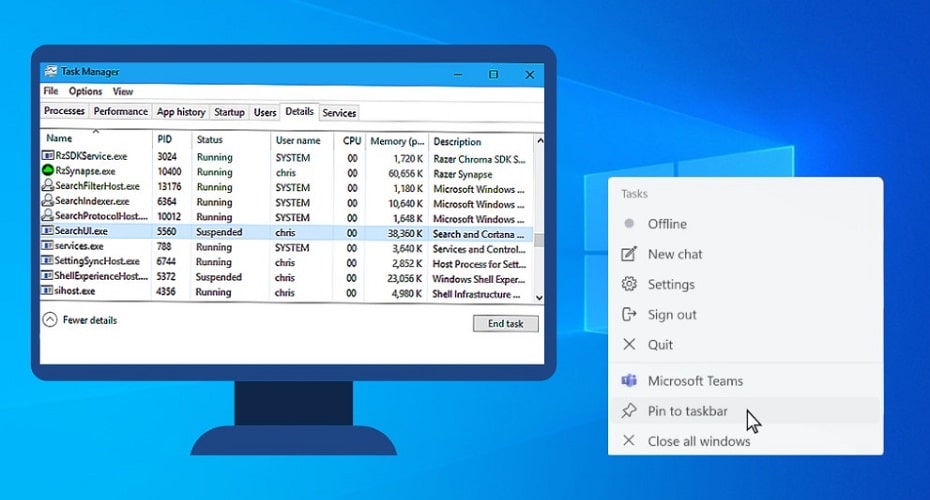
Step 1: Open the Task Manager window. Do this by right-clicking on the taskbar and selecting Task Manager in the menu options.

Alternatively, you can launch the Task Manager window by simply pressing the following keys simultaneously: Ctrl + Shift+ Esc.
Step 2: In the Task Manager window, click on the Details tab, search for Searchui.exe or SearchApp.exe.

Step 3: Upon locating it, click on the End Task button at the bottom of the same screen.
Alternatively, you can terminate the search process by right-clicking on the app then selecting End Task in the popup menu option.
A popup window will appear requesting you to confirm the operation to End SearchApp.exe. Click on the End process button.

After ending the Searchui.exe process, next, you need to restart the process all over again. To do that, proceed as follows…
Step 4: Click on the search bar to allow Windows to restore the search bar functions by restarting the Searchui.exe process.
Method 2: Using PowerShell
Step 1: Right-click on the Start Menu and select Windows PowerShell (Admin) from the menu options.

Step 2: taskkill/f /im SearchUI.exe or taskkill/ f /im SearchApp.exe, press Enter to execute the command.
After running the command, the search bar process will be terminated. Restarting the process is as easy as clicking the search bar so that windows automatically restarts the process again.
- Tip! Note that the processes mentioned above are helpful in hiding or stopping the running of the search bar process temporarily. The process will still be running in the background and quickly restarted by simply clicking on the search bar. However, it’s also possible to stop the search bar process completely.
How to disable Searchui.exe permanently
The following steps will help you disable Searchui.exe permanently on your PC using the Windows PowerShell utility feature. Proceed as follows…
Step 1: Right-click on the Start menu, select Windows PowerShell (Admin) to launch the PowerShell window.
Step 2: Type the following command in the new PowerShell screen: cd C:\Windows\SystemApps and press Enter. That will open the system Apps directory on your PC.
Step 3: To view the list of sub-folders within the SystemApps directory, type the following command within the PowerShell window: Is
Step 4: Within the list of sub-folders, look for any of the following folders:
Step 5: After locating one of the folders above, use the following command to open it:
or
then press Enter.
With PowerShell in the correct folder, the next task is to take ownership and rename the Searchui.exe (or SearchApp.exe) files. Proceed as follows….
Step 6: For the Microsoft.Windows.Cortana_cw5nlh2txyewy folder, replace file.exe with SearchUI.exe.
Step 7: With the renaming bit of the process done, the next task is to stop and disable the search bar function. To do that, execute the following commands sequentially, i.e., press Enter after each command.
With the Search Bar function, the next task is to disable the search bar function permanently by stopping windows from opening the process. Proceed as follows…
Step 8: Depending on your version of Windows 10, type the following command, then press Enter.
Congratulations! You’ve successfully disabled the search bar function permanently on your computer.
Searchui.exe high CPU usage
A major problem associated with the latest Windows 10 update is Searchui.exe high CPU usage. Sometimes Cortana uses upwards of 45% of a computer’s CPU when the PC is idle. That’s not only disturbing but also worrying, considering that not many people use this Windows 10 feature anyway.
Luckily, fixing this problem is very easy. Follow the steps below to get it done….
Step 1: Open the Windows Run function by pressing Windows key + R. On the Run screen, type Regedit then Enter, or click OK to open the registry editor window.

Step 2: Next, locate this file path:

Step 3: Find the “BingSearchEnabled” value, then set the value data to zero, i.e., 0.
Step 4: Restart your PC for the changes to be effected.
You may want to check the CPU usage of Cortana or Searchui.exe via the Task Manager utility to see whether or not the problem was fixed.
- Tip! If the issue isn’t fixed by setting the value of the “BingSearchEnabled” to 0, consider changing it to 1.
Conclusion
While the Searchui.exe feature makes for easy browsing of the web and searching for files within your PC, the fact is that this Windows 10 utility feature also slows down certain functions of the computer.
With that being said, it is possible to disable Cortana on your PC so that you use a lighter and faster third-party search tool that won’t affect your computer’s performance.